
by Alex Banks
We spent years in Chicago performing late night, low-class improv comedy to audiences who were completely wasted. It's a commonly known improv fact that being a pirate in a scene is a hacky thing to do, but we know our way around pirates. If you were to ask me, what do pirates have to do with React? I would reply, Captain Hook obviously. A point that we spent a lot of time driving home at Reactathon.
What do pirates have to do with web development? Well, just like pirates choose to use hooks over hands, more and more web developers are choosing to use hooks over classes. They provide a clean way incorporate reusable functionality into components. Recently, Apollo launched a library of hooks that interact with the Apollo Client. Using @apollo/react-hooks is like putting a pirate on a rocket-ship to the moon. Yea, it's badass. Let's take a look.
In this example, we are going to look at what it takes to build a chairlift status page for a fake ski resort, Snowtooth Mountain. Skiers use chairlifts to get up the hill. Chairlifts are like flights. Sometimes chairlifts are placed on hold due to inclement weather conditions, and other times they are closed. Typically, the ski patrol is responsible for opening and closing chairlifts. We need to build a tool that the fake ski patrol can use to open and close fake lifts so that this fake status can instantly be communicated to the fake skiers.
Snowtooth already has a lift and trail status api. If you follow along, we'll all be using the same API which could get chaotic because anyone connected to this API can change a lift status at anytime. If you want to work in your own sandbox you can clone the lift and trail status repository and run this GraphQL API locally.
In order to get current data about all of the lifts, we will be running this query:
query {
  allLifts {
    id
    name
    status
  }
}
This will return the id, name, and current status of each chairlift. To change the status we will be running this mutation:
mutation SetLiftStatus($id: ID!, $status: LiftStatus!) {
  setLiftStatus(id: $id, status: $status) {
    id
    status
  }
}
This mutation requires a lift id and status which can be either OPEN, CLOSED, or HOLD. Finally we will be listening for status changes using this subscription:
subscription {
  liftStatusChange {
    id
    status
  }
}
Whenever anyone changes the stats of any lift, that lift's id and new status will be pushed to the client. You can test all of these out in the lift and trail status api.
Creating a React App
To get started we will need to create a new React application. We can use create-react-app to provide the initial application. Run the following command in your terminal:
npx create-react-app snowtooth-ui
cd snowtooth-ui
This will generate the initial React application and move you to that folder where you will be working. With React application in place, it is now time to setup Apollo CLient. First, we'll need to install the necessary tools to build the client:
npm i apollo-link-http apollo-cache-inmemory apollo-client
This installs the http link that we will use for network communication, the cache that the client will use to cache data in local memory, and Apollo Client itself.
Now we'll need some tools to use the client with React:
npm i @apollo/react-hooks graphql-tag
This installs @apollo/react-hooks, the Hooks library that is the subject of this article along with the graphql-tag function that we will be using when we define our operations.
Finally, we need styled-components to help us build status indicators:
npm i styled-components
Setting up Apollo Client
First, we need to set up an instance of the Apollo Client and add it to React Context using a Provider. In the ./src/index.js file, add the following code:
import React from 'react';
import { render } from 'react-dom';
import { ApolloClient } from 'apollo-client';
import { InMemoryCache } from 'apollo-cache-inmemory';
import { createHttpLink } from 'apollo-link-http';
import { ApolloProvider } from '@apollo/react-hooks';
import App from './App';

// 1. Create Apollo Client instance
const link = createHttpLink({ uri: 'http://snowtooth.moonhighway.com' });
const cache = new InMemoryCache();
const client = new ApolloClient({ link, cache });

// 2. Place client in context
render(
  <ApolloProvider client={client}>
    <App />
  </ApolloProvider>,
  document.getElementById('root')
);
Then, we'll create a new instance of the Apollo Client using a http link to manage the network requests along with an instance of the InMemoryCache for caching the data. The http link will point to http://snowtooth.moonhighway.com, the lift status api. Next, we add the client instance to React context using the ApolloProvider. This means that any children of the App component will have access to the client via context.
The useQuery Hook
We are now ready to incorporate our first hook, the useQuery hook. We will use this hook in the main <App /> component where we will display the lifts along with their current status. Open, or create and open, the ./src/App.js file and add the following code:
import React from 'react';
import styled from 'styled-components';
import gql from 'graphql-tag';
import { useQuery } from '@apollo/react-hooks';

const QUERY = gql`
  query {
    allLifts {
      id
      name
      status
    }
  }
`;
Then we import React, useQuery, and gql (a function that will turn our query into an AST). We also import styled-components. We also declared a QUERY using the allLifts query that we introduced above. Let's use this query with the useQuery hook:
export default function App() {
  const { loading, data } = useQuery(QUERY);

  if (loading) return <p>loading lifts</p>;

  return <h1>Snowtooth Lift Status</h1>;
}
The App component obtains the loading state and data from Apollo via the useQuery hook. Although the first line of code inside this function may look like a standard variable declaration, it's not. It's a hook. This means that whenever the state of our allLifts query changes in Apollo Client, the App function will be reinvoked. This is presently happening. You can view it by starting the development server:
npm start
After you start the development server, you will see that the <App /> component renders twice. It happens pretty fast, you may need to throttle your browser to see it. In Google Chrome, you can throttle network request speed by opening the developer tools and accessing the network panel. There is a drop down list on this panel that can be used to throttle requests. Choosing Fast 3G or Show 3G from the drop down will slow the network down enough to initially see the loading message:

The first time the App component is rendered, the value for loading is true. This is because Apollo Client is currently sending the query. It's loading our data. Once we have a response, the useQuery hook will invoke the App function again. This time the loading state is false, our data has loaded and we see the page heading:

You could obtain any errors by destructuring the error field in the response. For brevity and simplicity, we will not be handling errors in this iteration.
It's time to render the data in a real user interface. Replace the current return statement with the following code:
return (
  <section>
    <h1>Snowtooth Lift Status</h1>
    <table>
      <thead>
        <tr>
          <th>Lift Name</th>
          <th>Current Status</th>
        </tr>
      </thead>
      <tbody>
        {data.allLifts.map(lift => (
          <tr key={lift.id}>
            <td>{lift.name}</td>
            <td>{lift.status}</td>
          </tr>
        ))}
      </tbody>
    </table>
  </section>
);
This table displays the name and status of each lift. That information is available in data.allLifts. A table row <tr> is created for each lift. Nested within the row, a table cell <td> is created for the lift's name and status.
It's time to use styled-components. Let's a visual indicator to display the current status:
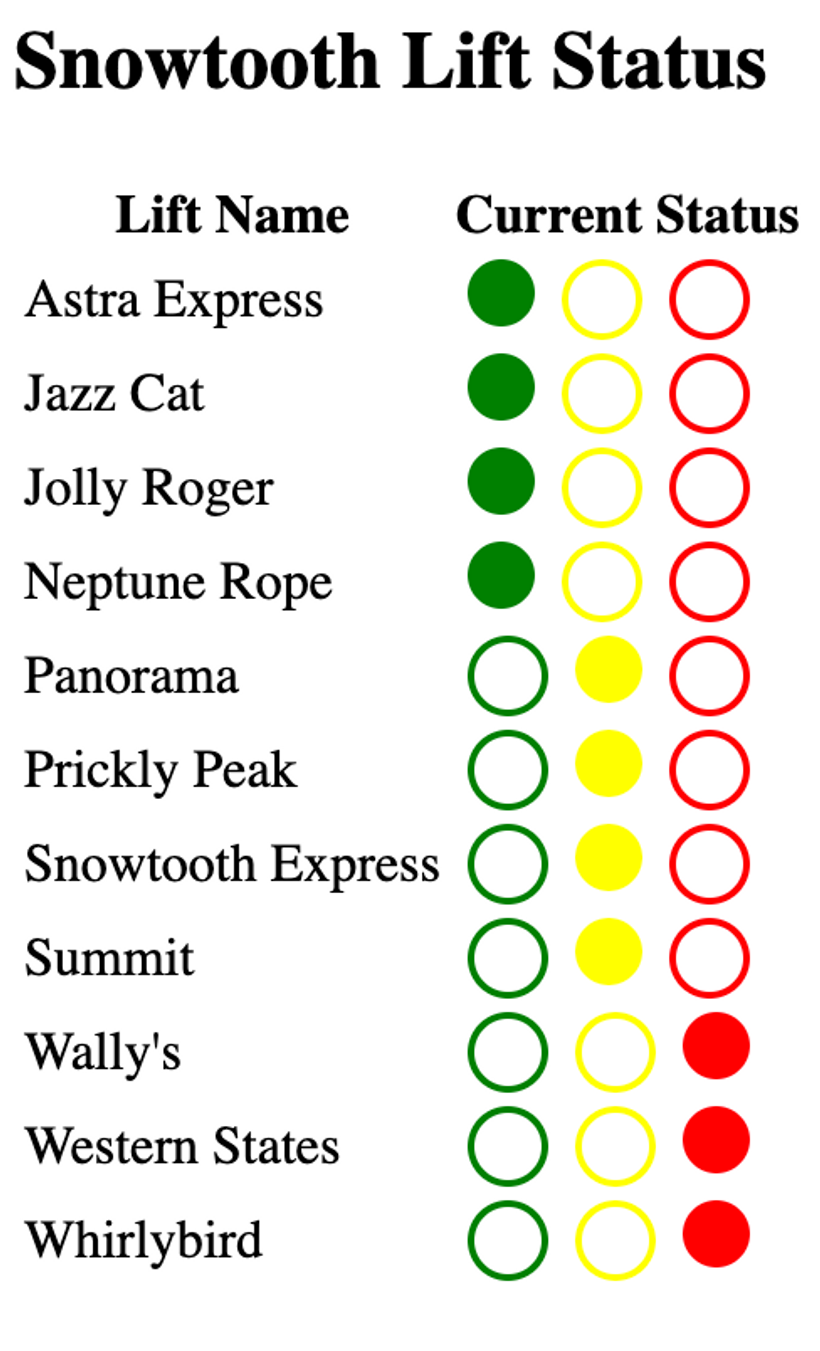
const StatusIndicator = ({ status = 'CLOSED', onChange = f => f }) => (
  <>
    <Circle
      color="green"
      selected={status === 'OPEN'}
      onClick={() => onChange('OPEN')}
    />
    <Circle
      color="yellow"
      selected={status === 'HOLD'}
      onClick={() => onChange('HOLD')}
    />
    <Circle
      color="red"
      selected={status === 'CLOSED'}
      onClick={() => onChange('CLOSED')}
    />
  </>
);

const Circle = styled.div`
  border-radius: 50%;
  background-color: ${({ color, selected }) =>
    selected ? color : 'transparent'};
  border: solid 2px ${({ color }) => color};
  border-width: ${({ selected }) => (selected ? '0' : '2')};
  width: 20px;
  height: 20px;
  float: left;
  cursor: pointer;
  margin: 0 4px;
`;
The second component, the Circle, displays an individual status circle. When the Circle is selected, the background color of that circle will be filled in. The first component, StatusIndicator, renders three circles: a green circle for the OPEN status, a yellow circle for the HOLD status, and a red circle for CLOSED. This component is also clickable. When a circle is clicked, It will send the current status to the onChange function. We'll use this event later when implementing the mutation. Right now, let's simply display the status with the StatusIndicator:
{
  data.allLifts.map(lift => (
    <tr key={lift.id}>
      <td>{lift.name}</td>
      <td>
        <StatusIndicator status={lift.status} />
      </td>
    </tr>
  ));
}
Now a visual indicator visually displays each lifts status.
The useMutation Hook
With the clickable StatusIndicator in place, we are ready to incorporate the useMutation hook. Go ahead and import this hook to the current file:
import { useQuery, useMutation } from '@apollo/react-hooks';And add the SetLiftStatus mutation to the file right below the QUERY:
const MUTATION = gql`
  mutation SetLiftStatus($id: ID!, $status: LiftStatus!) {
    setLiftStatus(id: $id, status: $status) {
      id
      status
    }
  }
`;
Just like we used the QUERY earlier, we can use this MUTATION in a hook. Locate the useQuery hook within the App function and add a useMutation hook right below it:
const { loading, data } = useQuery(ALL_LIFTS_QUERY);
const [setLiftStatus] = useMutation(MUTATION);
This hook returns an array. The first value in that array is a function that we can use to trigger the mutation. Here we destructure this value into a variable called setLiftStatus. The second value of this array is an object that will give you the loading and error state of the mutation, but we are currently not using those fields.
We can now add the onChange function to the StatusIndicator:
<StatusIndicator
  status={lift.status}
  onChange={status => {
    const variables = { id: lift.id, status };
    setLiftStatus({ variables });
  }}
/>
When the user selects a status by clicking one of the status circles, the onChange function will be invoked and the status: OPEN, HOLD, or CLOSED will be passed to the handler. Within the handler we will create an object called variables. This is where we will pass the values for the current lift's id and it's new status to the mutation. Invoking setLiftStatus will cause the client to send the mutation to our API. Remember, useMutation is a hook. It will cause the App component to re-render when the mutation state changes. In this example, every time we change the status of a chairlift, the App function will be invoked twice: once when the client sends the mutation, and again when the client receives a mutation response.
When the mutation receives a response, something magical happens. The Apollo Client knows that we asked the mutation to return the id and new status of a specific lift. The client will use the id to locate the Lift within the local cache and update its status. Changing this value in the cache causes the App function to be invoked again. That's right one click causes this component to be rendered 3 times. The first render is when the mutation is being sent, the second render is when the mutation receives a response, and the third render comes from the useQuery hook. It invokes the App function again because the cache has changed and new data is available. This is awesome because the new data will automatically be rendered and we will see the status indicator indicate a new status.
The useSubscription Hook
At this point, we can use our app to change the status of individual lifts. However, if we open another browser tab, we will not see the lift status change reflected in the new tab. Additionally, if any other user changes the status of any lift, we will not see that change until we refresh the page.

We can fix this by adding a subscription to listen for status changes on Lift types. Before we get started, we need to configure the Apollo Client to handle subscriptions. We'll need to install the following npms:
npm i apollo-link-ws subscriptions-transport-ws
This installs the apollo-link-ws, a link that we can use to handle networking requests over WebSockets. Subscriptions use WebSockets. The apollo-link-ws requires the subscriptions-transport-ws package. This package contains the client socket code that is necessary to make subscriptions work.
We'll need to use these packages in our client configuration, add them to index.js:
import { WebSocketLink } from 'apollo-link-ws';
import { split } from 'apollo-link';
import { getMainDefinition } from 'apollo-utilities';
Now replace the link that we use to create client instance. We'll actually need to create two links: one for http requests, and another for websockets. We'll also need to use a function to decide when to use which link.
const httpLink = createHttpLink({
  uri: 'http://snowtooth.moonhighway.com'
});
const wsLink = new WebSocketLink({
  uri: `ws://snowtooth.moonhighway.com/graphql`,
  options: {
    reconnect: true,
    lazy: true
  }
});
const link = split(
  ({ query }) => {
    const { kind, operation } = getMainDefinition(query);
    return kind === 'OperationDefinition' && operation === 'subscription';
  },
  wsLink,
  httpLink
);
Here we renamed the link to httpLink. This link will work as it did before. It will send queries and mutations to http://snowtooth.moonhighway.com. Below that we created a second link, the wsLink. This link is used to connect to the websocket at ws://snowtooth.moonhighway.com/graphql. In the options we tell this link to attempt to automatically reconnect when the connection is dropped. We have also set the lazy option to true which prevents our link from connecting to the web socket until the client has been asked to subscribe. No need to connect to a socket when there is not a subscription.
The Apollo Client can only use one link at a time, so we use the split function to split between the httpLink and the wsLink. The first argument sent to this function is a predicate. A predicate is a function that only returns true or false. In this case, it is a function that checks the current operation to see if it is a subscription operation. If this function returns true, the next argument, the wsLink, will be used. If the predicate returns false, as it will when the operation is a query or a mutation, the value of the third argument sent to the split function will be used. This is the httpLink. With our new link in place the Apollo Client is ready to handle the useSubscription hook.
Next, we will need to import the useSubscription hook:
import { useQuery, useMutation, useSubscription } from '@apollo/react-hooks';Now, we will need to add the GraphQL subscription to the page right below the QUERY and the MUTATION:
const SUBSCRIPTION = gql`
  subscription {
    liftStatusChange {
      id
      status
    }
  }
`;
Just like before, we can use this SUBSCRIPTION in a hook. Add the useSubscription hook right below the useMutation hooK:
const { loading, data } = useQuery(QUERY);
const [setLiftStatus] = useMutation(MUTATION);
useSubscription(SUBSCRIPTION);
That's it. The subscription should be working. Wait, that's it? It's voodoo for sure, but adding this hook tells Apollo Client to listen for a subscription. When a subscription is received, the hook will cause the App function to re-render. Then Apollo Client will use the id returned by the subscription to locate the Lift object in the cache and update the value of it's new status. Changing the data in the cache causes the useQuery hook to invoke the App function again with the new data from the cache. This time the data change will be reflected in the UI, and you will see all of the connected clients update their UI as well... that's it.

Now we have an app that the ski patrol can use to change lift status in real time. The data is provided by the useQuery hook, changed with the useMutation hook, and synchronized with the useSubscription hook. You now know what it feels like to be a pirate on a rocketship to the moon!
The project is running here on CodeSandbox: